I recently purchased a ZoomFloppy board, which allows old Commodore IEC serial devices – most importantly, floppy drives – to be connected to a USB port on a modern computer. It’s a great little device, but the instructions aren’t up to scratch: binary software is provided for Windows, manual installation instructions for OS X, but Linux users are left to their own devices.

Here, if for no other reason than I’ll need these if I have to reinstall it, is how I got the ZoomFloppy working on Ubuntu 14.04. You’ll need an up-to-date compilation environment installed, so start by making sure you’ve got the basics:

sudo apt-get install libusb-dev build-essential linux-headers-generic git

Next, you’ll want to download, compile and install the CC65 compiler. No, you really will. Trust me on this one.

cd ~
git clone https://github.com/cc65/cc65.git
cd cc65
make
sudo prefix=/usr make install
Assuming all went well, download, compile and install OpenCBM:
cd ~
git clone  git://git.code.sf.net/p/opencbm/code opencbm
cd opencbm/opencbm
make -f LINUX/Makefile
sudo make -f LINUX/Makefile install install-all install-plugin-xum1541
sudo ln -s /usr/local/lib/libopencbm.so.0 /usr/lib/libopencbm.so.0
That last line fixes a problem where OpenCBM ends up looking in the wrong place for its library.  Finally, you’ll need to add udev rules for the ZoomFloppy hardware itself:
sudo vim /etc/udev/rules.d/45-opencbm-parallel.rules
Add the following lines to the bottom of the file, then save and quit:
SUBSYSTEM!="usb_device", ACTION!="add", MODE="0666", GOTO="opencbm_rules_end"
# zoom floppy
ATTRS{idVendor}=="16d0", ATTRS{idProduct}=="0504", GROUP="users", MODE="0666"
LABEL="opencbm_rules_end"
Restart udev:
sudo service udev restart
Connect your ZoomFloppy and IEC device and check all is well:
cbmctrl detect
That’s it. Enjoy!
UPDATE:
I’ll probably need to refer to these instructions for enabling the VICE C64/128 emulator to talk to a physical drive via the ZoomFloppy at some point, too. You need to check two options off. The first is Settings -> Peripheral Settings -> Device #8 -> Enable IEC Device. The second Settings -> Peripheral Settings -> Device #8 -> Device Type -> Real Device Access. With both ticked and the ZoomFloppy connected, you can talk to the physical floppy drive as though it were Device 8 (i.e. load”*”,8,1). Huzzah!

I had cause to need to mount a hard drive – actually, a Compact Flash card, but that’s beside the point – from an Amiga on my PC the other day. In theory, not a problem: Linux includes in-built support for Amiga FastFileSystem (AFFS) devices, so it should just be a case of identifying which of the three partitions I’m after and giving the mount command.

So, let’s fire up fdisk:

$ sudo fdisk -l
 Disk /dev/sdc: 4009 MB, 4009549824 bytes
 124 heads, 62 sectors/track, 1018 cylinders, total 7831152 sectors
 Units = sectors of 1 * 512 = 512 bytes
 Sector size (logical/physical): 512 bytes / 512 bytes
 I/O size (minimum/optimal): 512 bytes / 512 bytes
 Disk identifier: 0x00000000
Disk /dev/sdc doesn't contain a valid partition table

Huh. That’s odd – it certainly should. Other partitioning tools say the same thing – and the reason becomes clear: apparently, while Linux technically understands AFFS partitions, it doesn’t actually understand Amiga partition tables. At least, most packages don’t: thankfully, one package does. So, to the wonderful parted:

$ parted /dev/sdc
 WARNING: You are not superuser. Watch out for permissions.
 GNU Parted 2.3
 Using /dev/sdc
 Welcome to GNU Parted! Type 'help' to view a list of commands.
 (parted) u
 Unit? [compact]? b
 (parted) p
 Pralloc = 0, Reserved = 2, blocksize = 1, root block at 62832
 Pralloc = 0, Reserved = 2, blocksize = 1, root block at 2112896
 Pralloc = 0, Reserved = 2, blocksize = 1, root block at 5965912
 Model: Generic STORAGE DEVICE (scsi)
 Disk /dev/sdc: 4009549824B
 Sector size (logical/physical): 512B/512B
 Partition Table: amiga
Number Start End Size File system Name Flags
 1 278528B 64061439B 63782912B affs1 DH0 boot
 2 64061440B 2099544063B 2035482624B affs1 DH1
 3 2099544064B 4009549823B 1910005760B affs1 DH2
(parted) quit

You may notice I told parted to switch unit type from the default – Compact – to Bytes. There’s a reason for that: because the kernel can’t see the partition table, it hasn’t created the usual sdc1, sdc2 and sdc3 devices under /dev – meaning I can’t tell mount where to look for the third partition, which is the one I’m after. A problem – but one that can be resolved by giving mount an offset option, taken from the ‘Start’ column of parted’s output:

$ sudo mkdir /media/AmigaMount
$ sudo mount -t affs -o offset=2099544064 /dev/sdc /media/AmigaMount
 mount: wrong fs type, bad option, bad superblock on /dev/sdc,
 missing codepage or helper program, or other error
 In some cases useful info is found in syslog - try
 dmesg | tail or so

Huh? What does dmesg have to say about this?

$ dmesg | tail -1
 [83740.730900] AFFS: No valid root block on device /dev/sdc

Okay, so that didn’t work. Now it’s time for the brute-force option: if mount’s offset command won’t work, let’s try setting up a loop device on the partition’s offset:

$ sudo losetup -o 2099544064 /dev/loop1 /dev/sdc
$ sudo mount -t affs /dev/loop1 /media/AmigaMount
$ ls /media/AmigaMount
 A500_A600_EtoZGames Disk.info Favorite Games.info
 A500_A600_EtoZGames.info Favorite Games

Bingo! At this point, you can read or write any file you like to the partition. To mount a different partition on the disk, simply give losetup the offset of that partition as reported by parted – remembering to tell parted to switch to bytes as its unit.

Having finished sticking my files on the drive, it’s time to tidy up and unmount:

$ sync
$ sudo umount /media/AmigaMount

Eject the drive, stick it back in the Amiga and lo: my files are there.

An alternative method to the above is to use an Amiga emulator on your PC: UAE, for example, can mount a real Amiga drive. This way’s easier, though – at least, if you don’t have to go through the troubleshooting steps that brought me to my understanding of the flaw.

To recap: insert Amiga drive, use parted in bytes mode to get partition offset, setup loop device at that offset, mount loop device. Not as simple as it should be, but hey: it works. This also works, interestingly enough, on disk images: create a backup of your Amiga drive with dd and you can then mount partitions directly from the backup rather than the real drive.

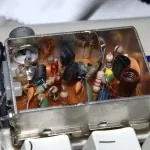
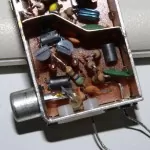
Helping out a friend with a picture or two of the Astec UM1233 RF Modulator’s inner workings. If you’re curious, it’s a device which was incredibly popular in the 80s and 90s in home computers, and takes video and audio as an input and turns them into either VHF or UHF (depending on country) radiofrequency signals – the same signals as analogue TV tuners expect to receive. If you crack open a ZX80, ZX81, Spectrum of almost any model, Commodore 64, ORIC, Newbrain, Dragon – almost any 80s microcomputer aimed at the home market – you’ll probably find one of these.

Franklin Ace 100 Manual ExtractI spotted this post on Boing Boing a while back, and meant to write something about it at the time but kept putting it off.  It’s been languishing at the bottom of my Google Reader Starred Items ever since, and as I’m in the mood to clear out some old stuff I figured now was as good a time as any to put it up here.

Basically, professional photographer David Friedman found a selection of old Franklin Ace 100 and Ace 1000 documentation from back in the early days of home computing – and there’s some absolutely awesome sections hidden therein, covering such topics as why breaking DRM is the best thing you could ever do and why end-user licence agreements are the spawn of Satan.

The latter section includes the following:

These [end user] licensing agreements typically stop just short of requiring you to sign away your life, your house, and your first born child.  Nobody in his right mind would sign one of them.  But personal computerists do it.  Are they of unsound mind?  Possibly, but signing a licensing agreement doesn’t prove it.

The section on DRM is even more shocking, with the writer not only encouraging circumvention of copy protection in order to produce backups of your purchased software, but even advising on how to do such wicked things:

All you need is a weapon, a program called a nibble copier.  It’s a cute name, but its purpose in life is malevolent.  It’s designed to copy uncopyable programs.
[…]
Two examples of high quality nibble copiers are Locksmith 4.1 TM and Nibbles Away TM.

The full manuals are available for your edification in PDF format from David’s site, Ironic Sans.

In a brave attempt to rid myself of some of the cruft I’ve gathered over the years, I’ve recently had a somewhat brutal clearout.  As well as all the rubbish that I’ve collected, I’m planning to get rid of the vast majority of my old gaming equipment – including my beloved Commodore C64 collection.

Accordingly, I’ve put a page on this ‘ere site called – surprisingly – For Sale, which contains – again, surprisingly – a list of all the items I’ve catalogued.  The page will be updated just as frequently as I can bring myself to, with the easier-to-catalogue stuff getting added first – which means that the C64 with its two large boxes filled with games will likely be last.

If you’re interested in any of the items you see, make me an offer either via e-mail or through the comment link on the page.

I’ve been on a massive clearout session of my old computing stuff with a view to finally decluttering my life after twenty-some years of being an unrepentant hoarder, and I spotted an old brochure lying in the bottom of a box.

Just think – for under £3,000 you can get an ‘ultimate games machine’ with a Pentium 200MHz CPU, 32MB of RAM, and a whole 3GB of hard-drive space!

Let’s compare to my mobile phone shall we?  ARM 266MHz, 16GB of usable space, 64MB of RAM…

I wouldn’t mind, but this was only 1996…