 Rooting your Android smartphone can offer some pretty amazing benefits, from simple things like the ability to take screenshots to the option to use your handset as a Wi-Fi hotspot. Perhaps the most impressive, however, is the option to change the apps that are pre-installed on your ‘phone, and replace them with your own.
In the case of my handset, a Motorola Milestone, app memory is at a premium: with just 196MiB of user-accessible storage on-board, larger apps can often mean having to remove something that’s already installed. Thankfully, there’s a cheater’s way of freeing up some much-needed space: turn your optional apps into pre-installed versions.
First things first: you’re going to need a rooted handset. If it’s not rooted, this tutorial will get you nowhere. If you’re new to rooting, try the Easy Root Compatibility Test which offers certain ‘phones a one-stop solution. If your handset isn’t supported, try one of the many guides on-line.
Once you’re rooted, you’re going to need a terminal emulator. Install that, and you can get access to a shell – which is where the fun begins.
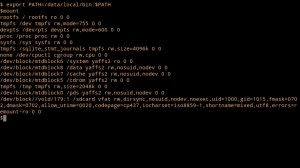
Step one – find out what’s mounted where with the command
mount
You’ll see that we have a bunch of devices mounted in a bunch of locations, but the one we care about is /dev/mtdblock6, mounted as /system. It’s in this special directory that Android stores all its internal gubbins – and to stop you from fiddling around with it, Google has very sensibly made it read-only.
Sadly, that also stops us from moving apps from the very limited user memory into the otherwise wasted system memory – and from deleting unwanted pre-installed apps, such as the Motorola-branded sat nav package that comes with the Milestone or the Facebook app that arrived unexpectedly as part of Android 2.1.
So, what can we do? Easy: we re-mount the device as read-write. You’ll need to become root using su, after which you can remount the block device. Just type the following commands in to the terminal:
su -
mount -o remount,rw /dev/mdtblock6 /system
Now we have full read-write access to the /system file system. Bring up a directory listing of /system/app/ with:
ls -l /system/app/
You’ll notice that all the .apk files for the pre-installed apps are here. Delete any .apk with rm and it’s gone for good – so for goodness’ sake be careful.
We can use the same command to take a look at the .apk files for the apps we’ve got installed in user memory, too:
ls -l /data/app/
To move a package from user memory to system memory, making it ‘pre-installed’ and freeing up useful user memory, just do the following:
cp -f /data/app/com.publisher.packagename.apk
The file will be automatically removed from user memory and appear to vanish – but when you restart your ‘phone, it will re-appear as a pre-installed ‘system’ application. Do this with a larger app, and you can free up a lot of valuable space.
A note about updating: because /system is mounted as read-only, the Android Market can’t write to it in order to update packages. Instead, if an update for a pre-installed package is available, it will write the data back into user memory. So, if you’ve saved 4MiB by moving Google Maps into /system, you’ll lose it all again the next time Google releases an update.
While it’s possible to get the space back – simply repeat the method of moving the file to /system again – it’s probably better to move applications that don’t get updated all that often.
That’s it: you can now enjoy significantly more space for apps!
